

In Depth Online Learning
This is an extended online version of Kasia’s popular Stained Glass Mosaic Owl Workshop. Everything covered in the original workshop, plus a lot more has been documented in detail and organized into easy to follow sections with videos, supplementary written lessons and photos. Once enrolled in the class, students have a lifetime access to all the class material and project templates from anywhere in the world.
I have learned a wealth of information about safely cutting stained glass. ~ Jackie from New York
A Set of 8 Whimsical Owl Templates Is Included
Beautiful designs specifically created with optimal learning are unique to Kasia’s classes. Learning is made easier and more fun when you know you’re working on a pattern that has yielded beautiful results over and over.
500+ students have successfully created an attractive mosaic based on one of the many templates that Kasia has designed with educational purposes in mind.

Learn to Choose a Strong Color Palette
The class has an in-depth lesson on choosing your color palette. It explains how to examine a mosaic design to better approach what some peoples see as an intimidating part of mosaics, something that can sometimes keep folks from getting started. This is just one of the many supplementary color diagrams from that lesson. Kasia likes to uses imagery to help students understand the concepts she uses in her own mosaic art. So there are lots of color swatches in this lesson that don’t just address the glass but the grout as well.

No Drawing Skills or Mosaic Experience Needed
No prerequisites or drawing skills are needed to be able to successfully complete one of the various class projects. The class covers the basics of every step of the stained glass mosaic process from start to finish. It is a great choice for someone looking to develop a strong foundation in stained glass mosaics and to grow as a stained glass mosaic artist. For a glimpse of what the class entails, scroll down for the table of contents of the many lessons.
Learn Precision Glass Cutting Through Demonstration and Practice
In this class you will begin with tutorials and demos for how to use each of the 4 hand tools Kasia uses to create all of her own stained glass mosaics – the glass scoring tool, the running pliers, the flathead tile nippers as well as the wheeled nippers. It is recommended that you practice the technique for each tool prior to moving onto your first class project.
Additionally, Kasia goes over the 4 types of most common glass scoring tools: the Pistol Grip Cutter, the Thomas Grip Cutter, the Comfort (pencil) Grip Cutter and the Custom Grip Cutter.

Following the initial demos, you will see Kasia cut out all of the shapes for Owl Design 1 in the main lessons of the class – you get to see the techniques used practically and can follow along with your own project.

Additionally, every class template (Design 2 – Design 8) comes with its own tutorial with more tips to help you while you keep learning. Plus each background tutorial comes with even more cutting tips.
Use the Front Mounting Technique For Glass Mosaics
Many beginners glue their mosaic projects one piece at a time. This can be very tedious, messy and interruptible to the creative process. The front mounting technique for stained glass mosaics more commonly known as the tape method makes the whole mosaic process much more enjoyable and less time consuming. You get to work on your mosaic without the pressure of gluing as you work. This technique also allows you to change your mind and to edit your project as you make progress.

Glue Your Mosaic as One Whole Piece

Once the Glue Is Dry, Peel the Tape
You can easily test your color choices, especially for backgrounds. Because your mosaic is not glued onto a substrate, you can easily lift it up and place it over different colored sheets of glass as seen below.

Easily Test Your Color Choices

The Mosaic is Securely Taped For Lifting
Learn How to Cut and Arrange Background Patterns
This class not only goes over use of a silhouette substrate (both for indoor and outdoor display) for your owl project but also a rectangular one which can be either framed or edged with a mosaic. Below you can see five of the class designs as silhouettes prior to the background pattern being added.

Six different background patterns for a rectangular mosaic will be demonstrated, each in its own tutorial.

Take a look below at the completed owl mosaics, each one with a different background pattern that is shown in a separate tutorial. All six projects are 20″ x 14″ in size.

Learn How to Create Substrates for Indoor and Outdoor Mosaics
Another new feature of the Online Owl Class is the demonstration of how we cut and edge wedi board to create substrates for outdoor projects. We show and explain an easy hanging system for wedi substrates. Additionally we demonstrate gluing with thin-set and grouting and edging with epoxy grout to create a finished and durable mosaic for outdoor display.

What’s Included
- A lifetime access to the vast and detailed Online Class, filled with videos as well as written lesson plans.
- A set of 8 downloadable Owl Template PDF’s designed by Kasia.
- Bonus video tutorials focusing on tips and tricks for each owl design included in the class.
- Access to a private Facebook Group for the students to participate in, to ask questions and to share photos of their work.
What You’ll Need to Get Started
Please take a look at the Free Preview of the Needed Materials in the Table Contents of the Class – this is near the bottom of this page.There is a complete outline of suggested materials and tools you will need to create and indoor project. Included are some links to the harder to find items. There is a separate resource list visible only to the online students.

Additionally there is a second list of materials and tools needed for an outdoor project which will need to be glued to a substrate suitable for the outdoors with an adhesive suitable for outdoors and it needs to be grouted with an outdoor grout.
How to Register
This 3 minute video will walk you through setting up a student account and class registration. Remember to save your username and password as that is your key to the class.
Once you register for the class and your order is processed by Kasia Mosaics, you will receive a Welcome Email as well as an invite to the class facebook group page. Both will be emailed to the email address associated with the paypal account used to purchase the class. If you would like this info to be sent to a different address, please notify us after you register.
The Class Table of Contents
Take a look below at the vast lesson plan for this online class. This is a full course that can be enjoyed over months of time, more like a college course rather than what one might be accustomed to from other online art classes. Students are encouraged to first follow the class in the order of the Sections and Lessons for best results and upon completion to refer back to specific lessons for refreshment. Each lesson is made up of not only videos but also supplementary written material as well as photos.
The class comes with 8 project templates. Each one teaching the student new lessons in glass cutting and arranging. Additionally each template gives the opportunity to explore creating new color relationships. Students can mix and match background patterns to each of their project – each pattern is explored in a separate tutorial. Each project can also be made for either indoor or outdoor display. Appropriate substrates, adhesives and grouts are suggested for each one.
The best part of the class is not that even a beginner with no mosaic or art experience can create a full set of these beautiful mosaic owls but that he or she will walk away with a solid foundation in stained glass mosaics. This class encourages practice of a new craft through repetitive learning. Students walk away with the knowledge and technique to take their own artwork to the next level!
Welcome to our Class
Now that you have registered for the class, you are ready to start! To enter the class, just remember to log into your account each time and click the newly appeared ‘Start the Course‘ button located under my photo on the upper right side of the Online Owl Class Page.
Once you enter the class, take a few minutes to click around to get familiar with the format. Look to the right at the drop down class menu which is made up of ‘Parts‘ and ‘Lectures‘. Clicking each ‘Part‘ will expand it into a series of ‘Lectures‘ which you can click on, one by one, as you learn. You can see this demonstrated in the video below.
I hope that you will enjoy the class, the lessons I’ve prepared for you, the designs I’ve include in the class and our interactive facebook group page. Most of all I hope that you will learn a lot, create beautiful mosaic owls and are inspired to continue creating your own mosaics following the class!
Thank You,
Kasia
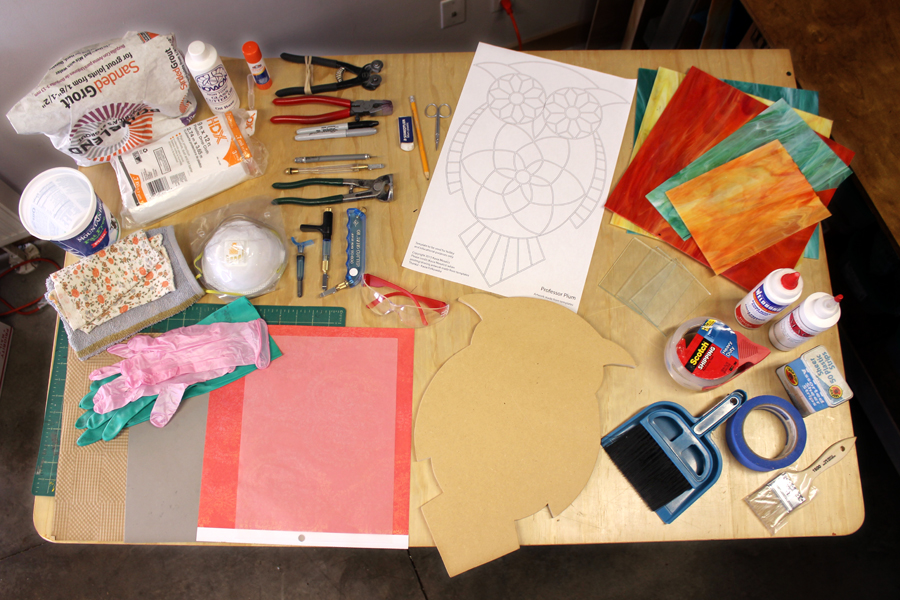
Introductory Video of What You’ll Need for an Indoor Project
This short video introduces the materials and tools needed to complete a class project for indoor display. A list of materials follows below. Further down is a supplementary list for additional materials and tools needed to create an outdoor mosaic. Note: It is recommended that if you’ve never created a mosaic prior to this class, that you start with an indoor project.
What You’ll Need to Get Started.
Before getting started please review the list of tools and materials you’ll need to complete the class project. Included are some links to the items you may not be familiar with. There are also approximate costs to help you prepare for your shopping spree!
Templates
Materials – MDF, Glass, Adhesive and Grout
- $15 – 2ft x 4ft mdf board that can be cut down to size for a few class projects (ready substrates can be purchased via the Kasia Mosaics Website at an additional cost)
- $50 – Stained Glass. If you are unfamiliar with glass, choosing a Glass Pack in a variety of color palettes can be a great option, many are in the $50 range (each sheet is usually 8″x8″ but double check before ordering). For beginners I recommend Spectrum Glass made by Ocean Side Glass from the these two families: Streaky and Wispy and/or Pearl & Crystal Opal (approx. price per sq ft is $8-13 depending on the color) Choosing 4-5 colors will be a good start. You can also check for cheaper glass at a hobby art store.
- $12+ – adhesive: Weldbond and a craft brush for application
- $10+ – grout (I use the Polyblend #60 Sanded Charcoal Grout from Home Depot)
- $5-$25 – tape (heavy duty shipping tape or the more expensive front mounting mosaic tape)
Glass Cutting Tools
Tool Costs are in US Dollars and approximations to give you an idea of the cost. Prices will vary depending on brand and quality. Cheaper tools may be purchased at a hobby store. Shipping costs are not included if you will be purchasing online. ($70 if you find good deals – may be less or more)
- $30-$40 – A top quality glass scoring tool from the Toyo Brand – some options are: Pencil Grip, Thomas Grip, Pistol Grip or Custom Grip (Studio-Pro Brand Pencil Grip Cutter is $20) Other cheaper options may be found in a hobby store.
- $10-$15 – Running Pliers
- $15-$20 – Flathead Tile Nipper
- $25-$35 – Wheeled Nippers (optional tool, not needed to get started but nice to have) Leponitt Brand is pretty good but others will do the job fine.
Other Materials
Here are miscellaneous materials you may already have or can acquire more easily.
- a black and/or sliver sharpie
- pencil and eraser
- an exacto knife, box cutter or scissors and a cutting-matt
- board paper, tracing paper and glue stick
- good quality clear packing tape
- blue painter’s tape
- a soft surface material to cut on (some popular choices are 1/8″ foam mat, homasote board, short carpet, cushion paper (I use indented kraft paper that comes with my glass order)
- disposable plastic mixing container (used yogurt containers are great)
- rubber gloves
- eye protection
- dust mask
- tarp or newspaper
- towels/rags
- hand broom and dustpan as well as broom and dustpan
Additional Materials and Tools for Outdoor Projects.
An outdoor mosaic needs to be glued to a substrate suitable for the outdoors with an adhesive suitable for outdoors and it needs to be grouted with an outdoor grout. Some materials from above (substrate, adhesive and grout will need to be substituted with items from the list below).
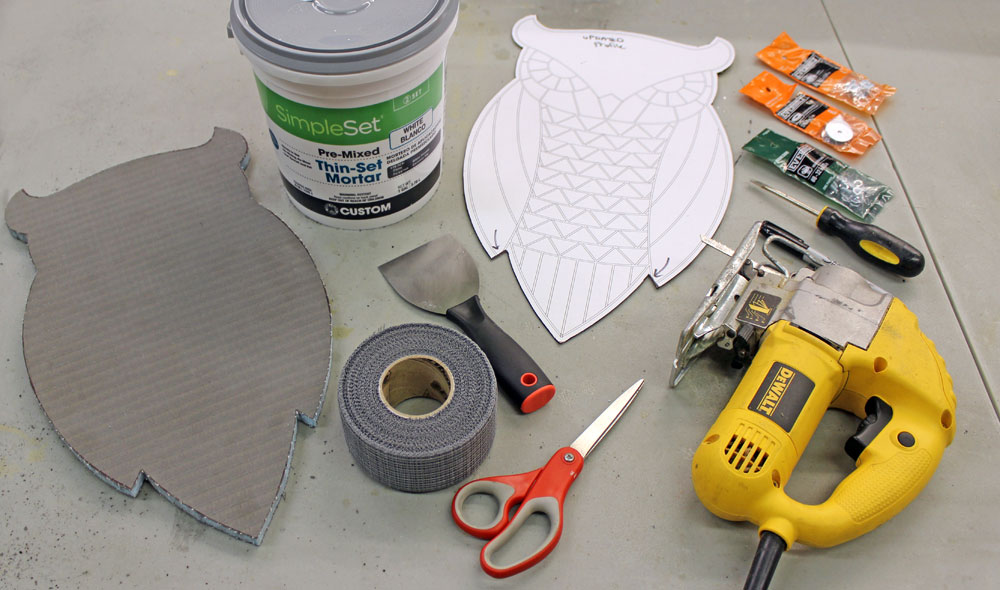
- wedi board – www.mosaicsmalti.com carries various sizes of 1/2 boards and ships outside of US
- jigsaw
- Alkali-Resistant 2in Self Adhesive Mesh Cement Board Joint Tape
- scissors
- putty knife or palette knife
- white thin-set compatible with glass and suitable for outdoor projects (dry or premixed) White Pre-Mixed Thin-Set Mortar
- 80 grit sand paper
- hanging system
- screwdriver
- Laticrette SpectraLOCK epoxy based grout (best choice for outdoor projects – it does not need sealing)
- respirator (I recommend wearing one whenever working with epoxy based products)
- popsicle sticks
- grout spreader (plastic or cardboard strips)
- sponge
- vinegar